In earlier versions of SCCM, customizing your inventory involved hand-coding MOF files and then replacing critical files in your SCCM installation directory with these. Even though SCCM was quite smart about parsing these and ignoring invalid files, this still scared most people off even attempting such things and thus custom inventory classes were sadly almost never used in production environments.
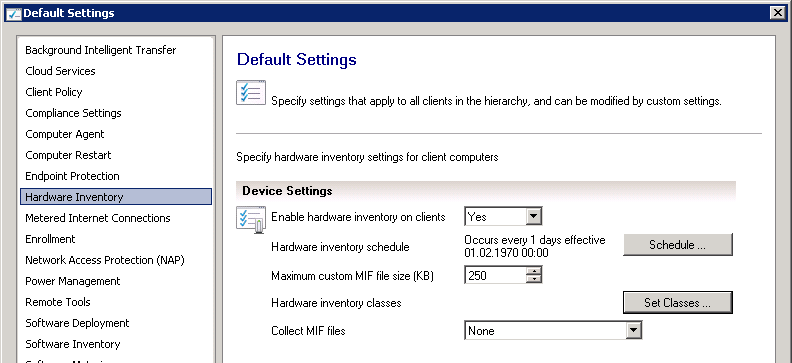
Luckily Microsoft streamlined the procedure in SCCM 2012 and it’s now possible to do this purely in the GUI. To extend the inventory, browse to “Administration” -> “Client Setting” then open your default client settings. Go to “Hardware Inventory” then click on “Set Classes…”
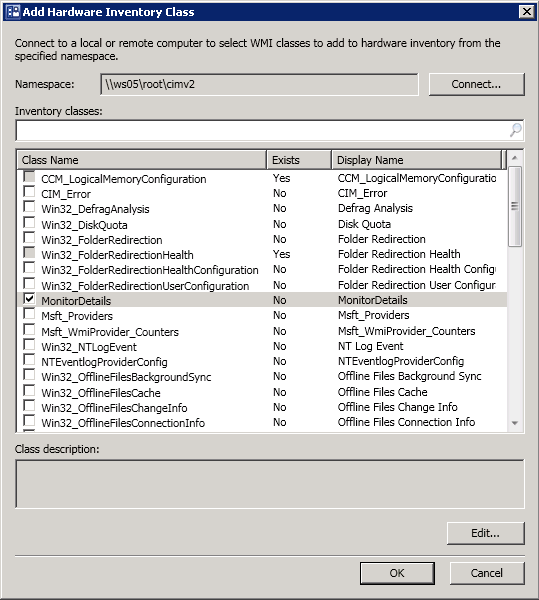
In the following window, click on “Add…” then on “Connect…” and enter the name of a PC that you have already run the script from part 1 on. You will then receive a list of the WMI classes available for collection on that PC, one of which will be our newly created one.
Select the MonitorDetails class for collection and press OK three times.
You can now either wait for the settings to take effect on your systems – which may take days depending on your hardware inventory cycle – or you can speed this up by first doing a Machine Policy Retrieval & Evaluation Cycle, waiting a few minutes for that to take effect, then follow up with a Hardware Inventory Cycle.

You will also get a new View in your SQL database called v_GS_MonitorDetails that you can query for reports.
In part 3 of this guide I will show you how to create a report to display this collected data.


Is it part 3 available now…I need it urgently..
excellent article..
I tried to first do it with screenshots but it didn’t work out well it was too confusing. I’ll have to do it as a Youtube video which takes more time
Hello friends, I implemented the solution, but I have a question, a team LENOVO, and tells me that your monitor is DELL 2208WFP not understand what happens. please help.
I have a laptop HP ProBook 6470b and tells me that the monitor is a syncmaster do not understand what happens, the query is fine, the query is fine, the ids are equal
Weird, that shouldn’t happen.
Can you try the debug version from http://exar.ch/files/get-monitor-details.ps1 and write what output you get from that?
I have same problem, when after all steps I ganarate report it shows same monitor info for every computer… When i run your debug script it shows:
Monitor 0
Generic Non-PnP Monitor
DISPLAY\DEFAULT_MONITOR\4&30E240E9&0&UID16843008
WMI+
Remove-WmiObject : Access denied
At C:\s\monit.ps1:110 char:32
+ Get-WmiObject MonitorDetails | Remove-WmiObject
+ ~~~~~~~~~~~~~~~~
+ CategoryInfo : InvalidOperation: (:) [Remove-WmiObject], ManagementException
+ FullyQualifiedErrorId : RemoveWMIManagementException,Microsoft.PowerShell.Commands.RemoveWmiObject
WMI-
First off, thank-you for the script! It helps fill a void I was facing. Secondly, I’ve already posted this comment under PART 1, but I realized that my question should have been asked here first as it is inventory related. Sorry for the duplicate post.
I am having an issue and I’m hoping you’re able to help. I’ve downloaded the script and executed on my local workstation. I can run “get-WMIObject MonitorDetails” and see the class but I’m unable to browse and see the class using Scriptomatic or WMI Code Creator. Any thoughts on where I went wrong? I have already modified the Hardware Inventory, and can see the class in my local ‘InventoryAgent.log’… but obviously nothing is going to be populated into the database if the values and class don’t exist on my local machine.
Hopefully I’ve missed something easy and you can help point me in the right direction.
Hi,
I’m also waiting for the part 3 “generating a report”? Is it available yet?
Yeah sorry the delay got a bit embarrassing… I added the next part now.
Hello!
Thanks for usefull article and experience. I have a issue: Resource Explorer doesn’t show a new class after HV inventory cycle. I checked that class installed on PC and View in SQL database also exist. What may cause of such beahivour?
Hi. Same issue here. The class is not showing up in Resource Explorer.
I had two problems:
1. The script didn’t run correctly from the SCCM package, so it didn’t create the WMI class and Object.
The solution: I had to use the correct parameters for powershell to run the script.
The Command line I had to use in the SCCM Program: powershell.exe -executionpolicy Bypass -file .\get-monitor-details.ps1
The package is set to be downloaded to the client, and the Program is set to run with administrative rights.
2. The information didn’t appear in SCCM Hardware inventory.
The solution: I had to untick MonitorDetails, click OK a couple of times, wait 5 minutes, then tick again MonitorDetails, click OK a couple of times, in Hardware Inventory Classes.
This regenerated the client policy, and the information started to appear in the system. I don’t know why it didn’t work right after I imported the class, but this solved my problem on the next day.
So, data started appearing in SCCM, and I am happy.
Thank you very much for the script.
Hello,
I was able to successfully deploy the script to one machine and add the class to Default Client settings.
I’ve also tried updating machine policy and hardware inventory but I’m not able to see the Monitor info in resource explorer.
Any help? (i’ve tried what Laci had suggested)
Thank you.
Can you display the WMI class on the PC locally by using “get-wmiobject MonitorDetails”?
If yes, the script is working, but you may need to wait for the hardware inventory task to complete. I noticed that it sometimes takes a few days for SCCM to update the hardware inventory.
Yes, the script works. I’ll give it a week and i’ll let you know if it worked.
Thank you.
Hello,
Waited for two weeks but it didn’t work for me. Worked for two other machines though.
Can you try guiding me in the right direction to troubleshoot the issue in order to get it working?
Thank you.
Yes, the script works. I’ll give it a week and i’ll let you know if it worked.
Thank you.
Awesome Script and Article. Thank you
Really excellent script, thank you very much! I was wondering – is there a way to make SCCM save the display history? If a user gets a new monitor for example, is there a way to collect data about that user’s previous monitor as well as the current one?
Thank you so much. This worked perfectly!!!
Hi,
I’ve tried everything here and it works like a charm. Only issue is that we have computers with more than 1 monitor. When checking the WMI Class we’ve created I am able to pull two monitors (instances), but in the Hardware Inventory that SCCM is collecting for some reason I only see one.
Can you help?
RS
SCCM should collect all instances if multiple ones exist on the PC, much like it does multiple hard disks etc.
Try looking in the v_GS_MONITORDETAILS view in the SCCM database, they should be there.
How did you see only one instance? Was it out of a report, or Resource Explorer?
Interesting blog my friend, keep updating your site
Hello,
I have also the problem that there is nothing in the Resource Explorer. I waited 2 days but still nothing. Do you know what that could be?
Капитал под ПТС в Питере. Машина остается у Вас
Приедем в любое удобное вам место для оценивания и заключения контракта
Скорое документальное оформление. Перевод наличных средств в течение 40 минут!
Бухгалтерские документы на руки после расчетов примерно через 5 мин. Абсолютно никаких справок не потребно
Рассматриваем с не хорошей кредитной историей
Преждевременное погашение без штрафов
Очень маленький процент, финансирование до 5мил.
Звоните 8 (95 8) 7-61 8 7 24
Антикредит-спб-птс.РФ
52b255
Pingback: Collecting monitor serial numbers with SCCM – exar.ch
gnpap3