
Configuration Manager already collects some information about the monitors by default, but it is being extremely stingy about it.

Monitors actually advertise quite a bit more about themselves to the computer in the form of the EDID record. They do that so the operating system can display valid resolutions to the user to choose from, but this record also includes some extremely useful data for our inventory, mostly the manufacturer name, the serial number and the manufacturing date.
Windows collects this data and stores it in the registry in a sub-key under HKEY_LOCAL_MACHINE\SYSTEM\CurrentControlSet\Enum\DISPLAY
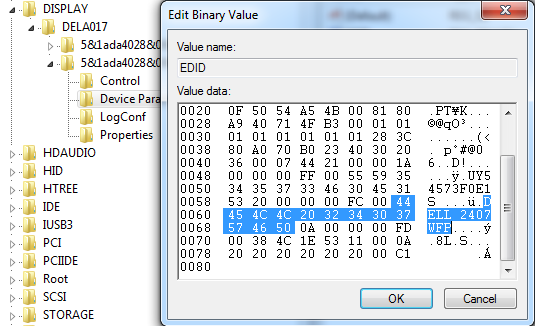
However as you can see above, it is stored directly in the raw binary format sent by the monitor. We can’t collect that from SCCM – it first needs to be converted into nice tabular data. For this, we will use a Powershell script.
We can run this script with administrator rights on any PC that has physical monitors connected to it. VMs and display-less computers obviously don’t work.
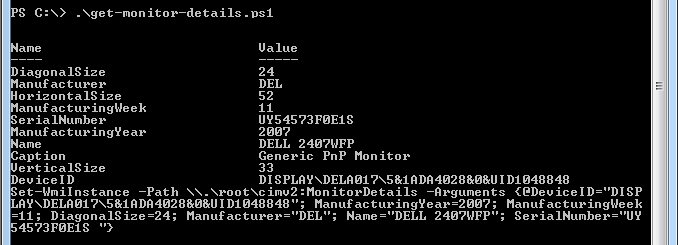
It will parse the binary data in the correct registry key, create a new WMI class if necessary, then fill it with the most useful EDID fields of all currently attached monitors.
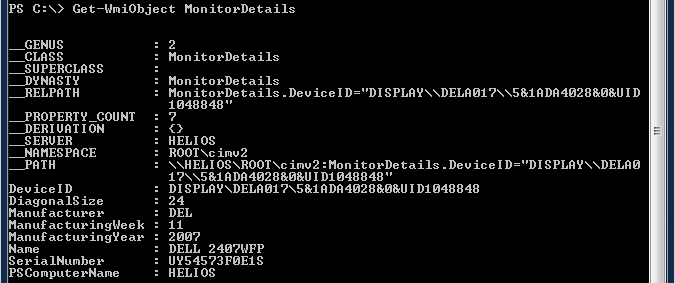
If you create a package in SCCM with this script and push it out to your PCs you will get a nicely formatted WMI class on all your systems. To make sure that later changes in hardware are correctly recorded you will need to set a repeated deployment schedule – I recommend setting it to the same interval that your hardware inventory runs at.
Alternatively you can of course also use Scheduled Tasks to regularly run it.
Now that we have our data available in WMI, read part 2 of this guide where I will show you how to collect a custom WMI class in SCCM 2012.
Hello,
I’ve packaged this script in SCCM. When I deploy it on a computer, the WMI class is created (so no ExecutionPolicy problem) but the instace with the informations of the monitors are not… Whereas if I execute the script manually on a computer, instances are populated.
Any ideas ?
Thank you for your excellent post.
Powershell can actually have different execution policies for different users (using the “set-executionpolicy -scope” option). Maybe that is the problem?
A good trick to simulate deploying a script is to use psexec from sysinternals ( http://technet.microsoft.com/en-us/sysinternals/bb897553.aspx ) and logon to a computer with that (with “psexec \\computername cmd”). If you do that you are logged on as the SYSTEM account to that computer, so you can attempt to run an installer or script as SYSTEM and find bugs that only show up under that account. Mostly those are because that account doesn’t usually have any rights on network shares or similar but sometimes there are user specific settings too (group policy etc).
I put a script copy with some more debug text up at http://exar.ch/files/get-monitor-details.ps1 maybe you can try that one, it will print more useful information on the command line.
First off, thank-you for the script! It helps fill a void I was facing.
I am having an issue and I’m hoping you’re able to help. I’ve downloaded the script and executed on my local workstation. I can run “get-WMIObject MonitorDetails” and see the class but I’m unable to browse and see the class using Scriptomatic or WMI Code Creator. Any thoughts on where I went wrong? I have already modified the Hardware Inventory, and can see the class in my local ‘InventoryAgent.log’… but obviously nothing is going to be populated into the database if the values and class don’t exist on my local machine.
Hopefully I’ve missed something easy and you can help point me in the right direction.
Thanks!
Trent
Just a bit more information… when I run wbemtest.exe I can see the class and the instances for each of my two monitors. The properties of the class are all empty (null to be exact), while the instances are populated with the correct information for my two monitors. I have also verified that the tables have been created in my ConfigMgr database, but they are empty. So it appears that the powershell script created the WMI class, and populated it, properly and the ConfigMgr HW Inv has been properly been configured but the data is not being stored in the database.
Is my hardware inventory not configured properly to gather the information from the instances? Why else would the WMI class and the tables within my ConfigMgr database have been created?
Thanks for any help! I was hoping to gather this info this weekend and provide a report early next week.
-Trent-
Thanks so much for this.
The script and your video for creating the report with the data were extremely helpful!
Hey, thanks for this great work. I used it in a slightly modified version. I hope this is fine for you. https://www.mg.wtf/using-a-configmgr-ci-to-create-a-wmi-instance-to-inventory-monitor-details/
Pingback: Using a Compliance Setting to create a WMI Instance to inventory Monitor Details - mg.wtf
Hello. Is someone looking how can we collect Dell monitor serial tag (not serial number) at same technical?
Hi
I am getting an error ” could not create wmi class ” any idea!
You’re probably not running it as administrator.
Hi
Thanks for your reply. I am running with admin right for sure. Here is the command I run and get this…..
PS C:\Users\jdoe> Invoke-Command -ComputerName j2xd0105564 c:\get-monitor-details.ps1
[j2xd0105564] Connecting to remote server j2xd0105564 failed with the following error message : The client cannot
connect to the destination specified in the request. Verify that the service on the destination is running and is
accepting requests. Consult the logs and documentation for the WS-Management service running on the destination, most
commonly IIS or WinRM. If the destination is the WinRM service, run the following command on the destination to
analyze and configure the WinRM service: “winrm quickconfig”. For more information, see the
about_Remote_Troubleshooting Help topic.
+ CategoryInfo : OpenError: (j2xd0105564:String) [], PSRemotingTransportException
+ FullyQualifiedErrorId : CannotConnect,PSSessionStateBroken
That sounds more like a problem with WinRM on the target computer. Try if you can do “enter-pssession” to it, otherwise you need to fix WinRM.
Hi
I thought so as well but was not sure. Yes I can not use “Enter-PSSession” either and having to run the scripts on remote all machine.
Do you know how to fix WinRM issue?
I manually start the WinRM services and still unable to run the script with Invoke-Command
Hi
When testing this on three different monitors I’m seeing differences with the manufacturer three letter IDs outputted by this script when comparing to one given by Extron’s EDID Manager software and MS’s PNP ID database. For example:
Acer should be ACR , while script outputs ADR
LG should be GSM, while script outputs HSM
Dell on the other hand shows DEL correctly on both.
Any ideas why?
Also Acer’s serial number doesn’t fully show correctly by this script because Acer provides the serial number after the 000000ff00 flag but the middle part of the serial number is hidden earlier in the EDID string. More here: https://stackoverflow.com/questions/27990788/acer-monitor-serial-number
it does not work for samsung and lg monitor because serial number is empty
hi can i have the script
hi can i have the script. i can not run the script i see on cmd
The download for the script is on this page. Look up under “For this, we will use a Powershell script”.
hi thank you for responding i am in urgent need of this ass i just can see the cmd two pages here and not able to run these commands. i need to add whole company’s monitors (serial numbers )in sccm inventory and i am lost i cant figure out please help
hi thank you for responding i am in urgent need of this as i just can see the cmd of two pages here and not able to run these commands. i need to add whole company’s monitors (serial numbers )in sccm inventory and i am lost i cant figure out please help
can i have the script please
We are running a computer replacement cycle as my organization and decided this year to include monitors as a part of this process. Used this script to query devices to see what users who are a part of the replacement cycle are currently using. This script worked like a charm. Thanks!